一、border-image属性简介
在CSS入门阶段,我们学习了border-style属性,也知道边框只有实线、虚线等几种简单的样式。如果我们想要为边框添加漂亮的背景图片,该怎么做呢?
在CSS3中,我们可以使用border-image属性为边框添加背景图片。现在所有主流浏览器最新版本都支持border-image属性。
语法:
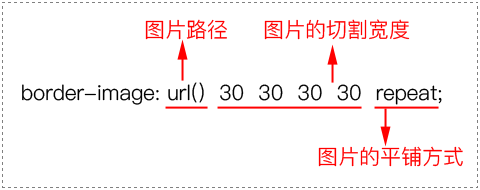
说明:
border-image属性需要定义3个方面的内容。
- (1)图片路径。
- (2)切割宽度:四条边的切割宽度,依次为上边、右边、下边、左边(顺时针)。
- (3)平铺方式:有3种取值,分别为repeat、round和stretch。
在本节所有例子中,我们都是使用图所示的这张90px×90px的图片作为边框的背景图片。

举例:
<!DOCTYPE html>
<html>
<head>
<meta charset="utf-8" />
<title></title>
<style type="text/css">
div
{
width:210px;
height:150px;
border:30px solid gray;
border-image:url(img/border.png) 30 repeat;
}
</style>
</head>
<body>
<div></div>
</body>
</html>
浏览器预览效果如下图所示。

分析:
从预览效果我们可以知道,位于4个角的数字1、3、7、9还是乖乖地位于4个角。然后4条边框的2、4、6、8会不断地平铺。
分析:
从预览效果我们可以知道,位于4个角的数字1、3、7、9还是乖乖地位于4个角。然后4条边框的2、4、6、8会不断地平铺。
对于border-image属性,我们总结如下:
- (1)在制作边框背景图片时,应该制作4条边,中间部分需要挖空。
- (2)边框背景图片每条边的宽度跟对应的边框宽度(即border-width)应该相同。
举例:平铺方式
<!DOCTYPE html>
<html>
<head>
<meta charset="utf-8" />
<title></title>
<style type="text/css">
div
{
width:170px;
height:110px;
line-height:110px;
text-align: center;
border:30px solid gray;
margin-top:20px;
}
/*第1个div平铺方式为:repeat*/
#div1{border-image:url(img/border.png) 30 repeat;}
/*第2个div平铺方式为:round*/
#div2{border-image:url(img/border.png) 30 round;}
/*第3个div平铺方式为:stretch*/
#div3{border-image:url(img/border.png) 30 stretch;}
</style>
</head>
<body>
<div id="div1">repeat</div>
<div id="div2">round</div>
<div id="div3">stretch</div>
</body>
</html>
浏览器预览效果如下图所示.

分析:
border-image属性的平铺方式有3种:repeat、round、stretch。
- (1)取值为repeat时,表示4条边的小方块会不断重复,超出元素部分将会被剪切掉。
- (2)取值为round时,表示4条边的小方块会铺满。为了铺满,边框图片会压缩或拉伸。
- (3)取值为stretch时,表示4条边的小方块会拉伸,边长有多长就拉多长。
二、border-image的派生子属性
border-image属性可以分开,分别为4条边设置相应的背景图片,这4条边的属性如下表所示。
| 子属性 | 说明 |
|---|---|
| border-top-image | 定义上边框背景图片 |
| border-bottom-image | 定义下边框背景图片 |
| border-left-image | 定义左边框背景图片 |
| border-right-image | 定义右边框背景图片 |
